
You can activate the SSL certificate you bought from CheapSSL in about 10 minutes by following these 4 steps.
- Generate your CSR code
- Paste the CSR code into the Create Certificate wizard in your account
- Complete domain validation
- Upload the resulting certificate to your server
Step 1 – Generating a CSR
First, you need to generate a CSR (Certificate Signing Request). Below you'll find how to generate a CSR depending on the web server you use. If you can't generate a CSR on your server, you can use our free CSR generator.
How to Generate a CSR with cPanel
Step 1 – cPanel SSL/TLS
Go to the SSL/TLS section in cPanel.

Step 2 – Certificate Requests (CSR)
Open the Certificate Signing Requests (CSR) section.

Step 3 – CSR Details
Fill in the form fields on the page that opens and click Generate.

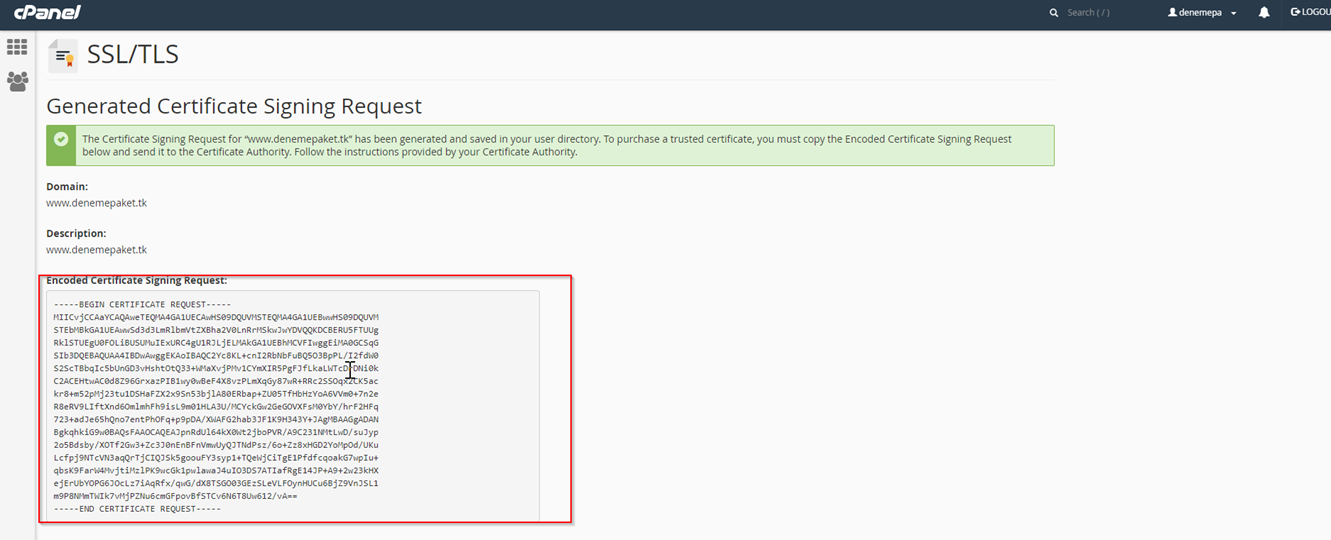
Step 4 – CSR Code Generated
The CSR Code will appear on the page.
The section starting with -----BEGIN CERTIFICATE REQUEST----- must be submitted with your order.

How to Generate a Plesk CSR Code
Step 1 – Plesk SSL/TLS
In the Plesk control panel, go to SSL/TLS certificates.

Step 2 – CSR Details
Fill in the fields on the page that opens with your own information. (For standard SSL certificates, the domain field should be "www.yoursite.com". For Wildcard SSL certificates, it should be "*.yoursite.com".)

Step 3 – Certificate Generated
After adding the SSL/TLS certificate, click your domain name once.

Step 4 – Copy CSR
Scroll down on the page that opens to view your CSR code.
How to Generate a CSR in IIS 7 and IIS 8
This guide covers generating a CSR (Certificate Signing Request) and a private key on Windows IIS 7 or IIS 8 servers. We recommend writing down your password and backing up your key, since it cannot be restored if lost and we cannot help recover it. Keep your backup files somewhere safe.
Step 1: Generate a CSR on IIS 7/8
- Click Start;
- Select Administrative Tools;
- Launch Internet Services Manager;
- Click your server name;
- In the center pane, double-click Server Certificates under Security.

Step 2: Create the Certificate Request Form
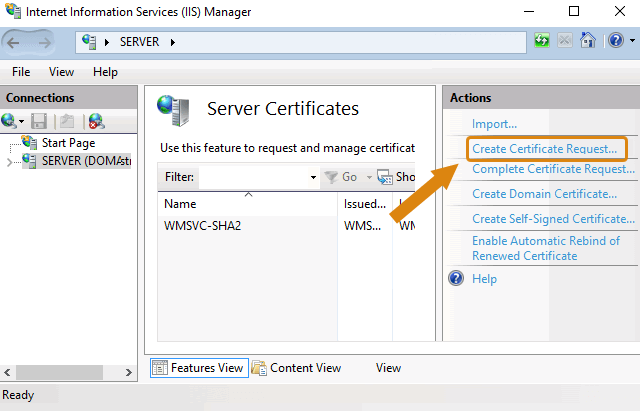
- In the Actions pane on the right, click Create Certificate Request.

Step 3: Fill In the Certificate Request Form
- The Distinguished Name Properties window will open. Enter the following information:
- Common Name: Enter the fully qualified domain name (FQDN) you intend to use the SSL certificate for. For a Wildcard SSL certificate, the Common Name must contain at least one asterisk (*). For example:
*.domain.tld,*.sub.domain.tld - Organization: Enter your company name.
- Organization Unit: Enter the relevant unit name (e.g., IT, Security).
- Company location: Enter country, city and region.
- Common Name: Enter the fully qualified domain name (FQDN) you intend to use the SSL certificate for. For a Wildcard SSL certificate, the Common Name must contain at least one asterisk (*). For example:
- Click Next.

Step 4: Cryptographic Settings
- In the Cryptographic Service Provider Properties window, leave the settings at their defaults (Microsoft RSA SChannel and 2048 bit).
- Click Next.

Step 5: Save the CSR File
- Enter a file name and location to save the CSR file. You'll need this file when installing your IIS SSL certificate.
- Click Finish.
- The newly generated CSR will be found in Desktopcert_req.txt.

Step 6: Save the Private Key (Optional)
- In the MMC snap-in, go to the Certificates section;
- Select Requests;
- Hover over All Tasks;
- Click Export.
Tips:
- When generating a CSR, make sure to include the -----BEGIN CERTIFICATE REQUEST----- and -----END CERTIFICATE REQUEST----- lines. Certificate generation cannot complete without them.
How to Generate a CSR in IIS 10
Generating a CSR in IIS 10
Guide to Generating a CSR on IIS 10.x
IIS (Internet Information Services) is a web server service on Windows that supports HTML sites, ASP.NET or ASP applications. In this guide, we walk step by step through generating a CSR (Certificate Signing Request) and private key on IIS 10.x.
Similarities with IIS 7 and IIS 8 In fact, the CSR generation process on IIS 10.x is nearly identical to IIS 7 and IIS 8. So if you've done this on those versions before, you'll follow similar steps on IIS 10.x too.
Important Reminders We strongly recommend saving your password somewhere and backing up your keys when generating a CSR and private key. If you lose your password or keys, there is no way to recover them and we cannot help with this. We recommend using reliable storage to keep your backup files.
STEP 1: Generate a CSR Code on IIS 10.x
To generate a CSR code using IIS 10 or 10.5 on Microsoft Server 2016, follow these steps:
Open IIS Manager from the Start Menu
First, go to the Start Menu and search for "Internet Information Services (IIS) Manager". Internet Information Services (IIS) Manager will open.Select the Server Name
Click the server name in the left pane.Open Server Certificates
Go to the IIS section in the middle pane and double-click Server Certificates.

STEP 2: Create the Certificate Request
Go to the "Actions" pane on the right and click "Create Certificate Request".
STEP 3: Fill In the Certificate Request Form
At this step, the Certificate Request Form Wizard will open. In the Distinguished Name Properties window, enter the following information:
In the Common Name field, enter the Fully Qualified Domain Name (FQDN) of the web address the certificate will be used for. Make sure the Common Name is the correct domain/FQDN that the CSR validates and that you'll use for the certificate. For a Wildcard SSL certificate, the Common Name must contain at least one asterisk (*). Example:
*.domain.tld,*.sub.domain.tldEnter the company name in the Organization field, and the organizational unit in the Organization Unit field.
Enter the company's location details: country, city and region.
Click Next.

STEP 4: Cryptographic Service Provider Settings
In the Cryptographic Service Provider Properties window, leave the default settings as they are:
- Microsoft RSA SChannel
- 2048-bit
Then click Next.

STEP 5: Save the CSR File
Enter a file name and location to save your CSR file. You'll need this CSR file when getting your IIS SSL certificate.
Click Finish.
Your new CSR file will be stored in Desktopcert_req.txt.

Step 6: Save the Private Key
- Go to the Certificates Section in the MMC Snap-in\nOpen MMC (Microsoft Management Console) from the Start Menu and go to the Certificates section.
- Select Requests\nSelect the Requests section in the left pane.
- Click All Tasks\nRight-click and select All Tasks.
- Select Export\nIn the menu that opens, click Export and follow the instructions to export your private key.
Tips
- When generating your CSR code, make sure to enter the full CSR text in the SSL creation form. Make sure the CSR text starts with ----- BEGIN CERTIFICATE REQUEST ----- and ends with ----- END CERTIFICATE REQUEST -----:
Step 2 – Enter the CSR Code
- Log in to your CheapSSL account. On the My SSL Rights page, click the Create Certificate button next to the product you purchased (for a renewal order, click Set Up Renewal).
- Paste your CSR code exactly into the field that opens: the text must start with
-----BEGIN CERTIFICATE REQUEST-----and end with-----END CERTIFICATE REQUEST-----. Your domain is read automatically from the CSR; click Continue. - Choose a validation method for your domain (Email, HTTP/HTTPS file, or DNS record) and click Continue. If your product includes extra domains (SAN), you can also add them at this step.
- Fill in the administrator and technical contact details (OV/EV certificates also ask for company details), review the summary and click Create Certificate.
Step 3 – Validation
Once the certificate request is submitted, the certificate's page opens in your account. You can continue with one of 3 methods to validate the domain. If you change your mind after choosing a method, you can pick another one from the Change validation method section on the same page. The page updates automatically once validation is complete.
Method 1: Email Validation
The most practical and most commonly chosen method. You choose one of the addresses starting with admin, administrator, hostmaster, webmaster or postmaster for your domain; a validation link is sent to that address. Once you confirm the link, your certificate is activated. If you didn't receive the email, use the Resend Email button on the certificate page.
Method 2: HTTP / HTTPS File Validation
The certificate page shows you the name and content of a validation file. You can download the ready-made file with the Download Validation File button and upload it to your site's /.well-known/pki-validation/ folder. Then click Check Validation Now.
Method 3: DNS (TXT / CNAME) Validation
Add the record shown on the certificate page to your domain's DNS settings. Once the record is added, validation completes within 10 minutes to 24 hours.
Step 4 – Installing the Certificate on the Server
Once validation is complete, your certificate is issued. You can download the certificate files from that certificate's page in your account. The resulting certificate is a CRT file; copy its text in full.
Installing in cPanel
Step 1: Log in to cPanel and under Security > SSL/TLS, go to Manage SSL Sites.

Step 2: Paste the CRT text you copied into the Certificate: (CRT) field, then choose Autofill by Certificate and save.
Your SSL certificate is now installed and your website is secure!

For other servers: see the cPanel and IIS 7/8 installation guides. After installing, you can check your setup with the SSL Checker.
Can't find the answer you need?
Contact Us